Opensuse 12,3 to 13.1 System upgrade
Now I will explane using command line - graphic tool and Manually
Command line
1. Check if the update repository already exists and is enabled.
Check if http://download.opensuse.org/update/12.3/ (replace 12.3 with your version) exists in one of the URI column values, and Yes in column Enabled, like the example below,
zypper repos --uri
#  | Alias           | Name            | Enabled | Refresh | URI
---+-----------------+-----------------+---------+---------+---------------------------------------
1  | repo-update     | repo-update     | Yes     | Yes     | http://download.opensuse.org/update/12.3/
If column Enabled says No, enable it by issuing this command, where ‘repo-update’ is the name of the update repository.
zypper modifyrepo --enable repo-update
If it exists and has been enabled, continue to step 3.
2. Add update-repository
Replace 12.3 above with your current openSUSE version.zypper addrepo --check --refresh --name 'openSUSE-12.3-Update' http://download.opensuse.org/update/12.3/ repo-update
3. Update system to the latest packages
zypper refresh
For more information, read Zypper Usage.zypper update
Graphical tool
Using YOU
YaST Online Update (YOU) is used to get patches to correct and improve your existing installation. YOU can be started through the YaST Control Center which you'll find under System in your menu. Or you can press Alt+F2 and type: yast.YOU will only install official patches and not package updates from various unsupported or 3rd party repositories.
Package Listing
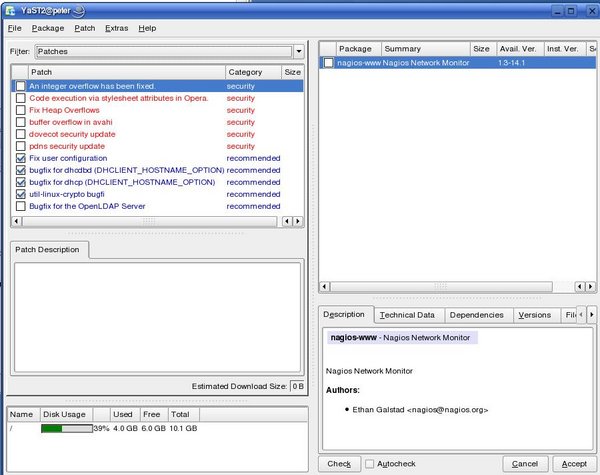
YaST Online Update now displays the updates that are available to your system in the top left box. If you highlight a patch, you will see a description of the patch in the lower left box. More information including the size of the patch and version information can be found by highlighting a patch and looking in the top right hand box. Additional information including what packages the patch effects and its dependencies can be found in the lower right box.To select a patch for downloading, it must have a check mark next to it. It is not necessary to download all available patches. Some may effect utilities you don't use or may be for hardware you don't have. For the most part, the descriptions are fairly good and should help you decide if it is an update you need. If it is a patch to existing software such as a kernel update you will see a swirl icon signifying an update. Other updates may be completely new packages. Should you get confused about what the symbols mean, click on Help -> Symbols for an explanation.
Once you have selected which packages to download and update, click "Accept".
Downloading and Updating
The next screen will display the progress of the downloading and updating according to the patches you have selected. Some packages may require you to agree to licensing terms or may have additional instructions on how to proceed with the update (these are the patches that may be skipped by a fully automatic update). You will see a checkbox near the bottom that says "Remove Source Packages after Update"; check that box if you do not want to keep the source packages. Leaving the box blank will save the source package so you can reinstall it later should you ever need to. This option should be selected if you want to save disk space.Once the download is complete the Finish button in the bottom right corner will become active. Click it and you will be taken to a new screen. This screen shows the progress as various systems are restarted so the new updates can be integrated with your system. Once this process is complete the screen will close automatically, and your update is complete.
Configuring the update servers
In order to get official updates via YOU, the update server must be added. This can be done automatically or manually.Automatically
Note: This is only supported until openSUSE 11.2. If you had a network connection during installation you would have been offered to add the update repository at that time. If you haven't done so you can do it later by starting YaST and selecting Online Update Configuration from the Software tab in YaST Control Center.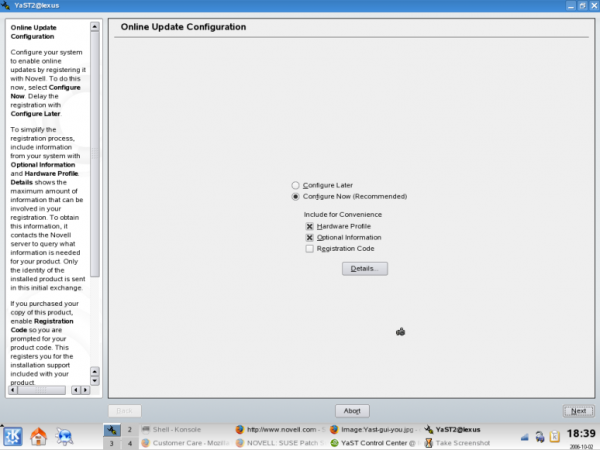
Manually
Adding repositories
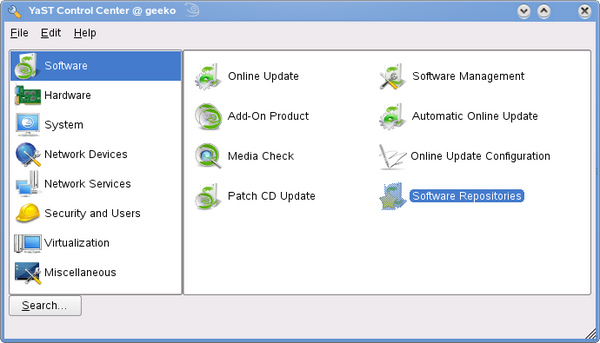
YaST software repositoriesStart YaST by clicking on it under Software in your menu or by typing yast in the run command box (press
Alt+F2).
Select Software Repositories.
Click on Add, select Specify URL.
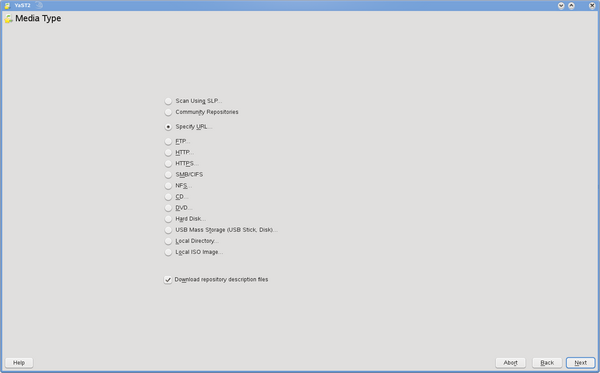
Then enter a Repository Name and a URL. It's recommended to copy/paste URLs to avoid typos.
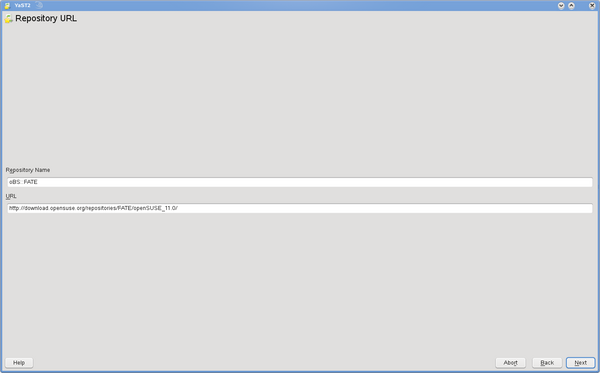
Package metadata will be downloaded and parsed - this takes time depending on mirror speed, your bandwidth, the size of the repository, the speed of your system.
You can remove or disable repositories at any time.
Some repositories never change, like the official oss and non-oss.
You should set refresh to Off for them. Non official and update have
new packages available all the time. It's convenient to have them
refreshed automatically at start up.
YaST-ncurses
Simply type yast in console and pressEnter. Now use your TAB and cursor keys to go to the right panel. Then use TAB and your arrow keys to navigate and go to Software Repositories. To add repositories, go to Add and select specify URL. Complete the fields with the necessary information then press Finish.
Zypper
You can add repositories to YaST with the command line interface Zypper.The syntax is:
# zypper ar -f <URL> <alias>
| ar | is short form of addrepo command |
| -f | instruction to zypper to add autorefresh flag to newly added repo |
| <URL> | is URL of the repo which you type in a browser to visit repo |
| <alias> | is name that is easy to remember |
--------------------------------------------------------------------------------------------------
Running the Upgrade
The following steps will show you how to upgrade your openSUSE distribution to the following release (eg. 12.3 -> 13.1). As already mentioned, any third party or OBS repositories can cause troubles, so it is recommended to disable or remove them before proceeding.Before you begin
Make sure that you read the list of annoying bugs for the new version you are going to install. Some of them could affect the update process. Usually, alongside the bug is listed some solution or workaround, so make sure that you are prepared for upcoming problems.Command line
As an example, we will be showing upgrade from 12.3 to 13.1 here:- Take a look at all repos you have
and remove all third party/OBS repos you no longer needzypper lr# zypper rr <alias> - Change all remaining repo URLs to the new version of the distribution (needs to be run as root)
(for a backup copy), then:# cp -Rv /etc/zypp/repos.d /etc/zypp/repos.d.Old# sed -i 's/12\.3/13\.1/g' /etc/zypp/repos.d/* - If you are upgrading from 12.1 or older, add non-oss-update repo # zypper ar -f http://download.opensuse.org/update/13.1-non-oss/ repo-update-non-oss
- Refresh new repositories (you might be asked to accept new gpg key)
If you haven't removed third party/OBS repositories you may encounter some errors as these repositories may not exist yet or they may have different unguessable URL. It is always recommended to remove them and add their newer version after upgrade.# zypper ref - Now execute the full distribution upgrade. It is strongly recommended that you run this inside GNU screen or tmux
to protect the upgrade process in case anything should go wrong with
the X session during the upgrade. Packages for both screen and tmux are
available in the main openSUSE repositories. tmux is probably a safer
bet, because for example if upgrading from 12.1 to 12.2, you would go
from a version of GNU screen which uses FIFO pipes to a version which
uses UNIX sockets, and GNU screen has a bug which breaks compatibility between these two approaches, which means that you cannot resume a screen session created in 12.1 using the version of screen from 12.2.
With the above command zypper will download all required packages and install them in heaps. To download all packages in advance, use:# zypper dup# zypper dup --download "in-advance"
If you did the above dist
upgrade before the official release date (eg. 2013-11-19 for 13.1), you
may have installed a Release Candidate (RC) or milestone version and
will need to repeat the final
zypper dup step now to receive the final release.- Search for updated openSUSE 13.1 compatible third-party repositories that you used before if you still need them and add them. Warning Use with caution. Using third-party repositories may break your system or cause instabilities.
Or, if you have URL of a .repo file:zypper addrepo --name <name> <url> <alias># zypper ar <url.repo>
- After upgrade, reboot is recommended to start new kernel and newer versions of everything.
In addition,
zypper up
can be run from time to time to ensure you have the latest available
packages from the various repositories that you have enabled. YOU (Yast
Online Update) only addresses security updates from the official
repositories.


0 comments :
Post a Comment