Now I will explane using command line - graphic tool and Manually
Command line
1. Check if the update repository already exists and is enabled.
zypper repos --uri
Check if http://download.opensuse.org/update/12.3/ (replace 12.3 with your version) exists in one of the URI column values, and Yes in column Enabled, like the example below,
#  | Alias           | Name            | Enabled | Refresh | URI
---+-----------------+-----------------+---------+---------+---------------------------------------
1  | repo-update     | repo-update     | Yes     | Yes     | http://download.opensuse.org/update/12.3/
If column Enabled says No, enable it by issuing this command,
zypper modifyrepo --enable repo-update
where ‘repo-update’ is the name of the update repository.
If it exists and has been enabled, continue to step 3.
YaST Online Update (YOU) is used to get patches to correct and
improve your existing installation. YOU can be started through the YaST Control Center which you'll find under System in your menu. Or you can press Alt+F2 and type: yast.
YOU will only install official patches and not package updates from various unsupported or 3rd party repositories.
Package Listing
YaST Online Update now displays the
updates that are available to your system in the top left box. If you
highlight a patch, you will see a description of the patch in the lower
left box. More information including the size of the patch and version
information can be found by highlighting a patch and looking in the top
right hand box. Additional information including what packages the patch
effects and its dependencies can be found in the lower right box.
To select a patch for downloading, it must have a check mark next
to it. It is not necessary to download all available patches. Some may
effect utilities you don't use or may be for hardware you don't have.
For the most part, the descriptions are fairly good and should help you
decide if it is an update you need. If it is a patch to existing
software such as a kernel update you will see a swirl icon
signifying an update. Other updates may be completely new packages.
Should you get confused about what the symbols mean, click on Help -> Symbols for an explanation.
Once you have selected which packages to download and update, click "Accept".
Downloading and Updating
The next screen will display the progress of the downloading and
updating according to the patches you have selected. Some packages may
require you to agree to licensing terms or may have additional
instructions on how to proceed with the update (these are the patches
that may be skipped by a fully automatic update). You will see a
checkbox near the bottom that says "Remove Source Packages after
Update"; check that box if you do not want to keep the source packages.
Leaving the box blank will save the source package so you can reinstall
it later should you ever need to. This option should be selected if you
want to save disk space.
Once the download is complete the Finish button in the
bottom right corner will become active. Click it and you will be taken
to a new screen. This screen shows the progress as various systems are
restarted so the new updates can be integrated with your system. Once
this process is complete the screen will close automatically, and your
update is complete.
Configuring the update servers
In order to get official updates via YOU, the update server must be added. This can be done automatically or manually.
Automatically
Note: This is only supported until openSUSE 11.2.
If you had a network connection during installation you would have been
offered to add the update repository at that time. If you haven't done
so you can do it later by starting YaST and selecting Online Update Configuration from the Software tab in YaST Control Center.
Manually
Adding repositories
YaST software repositories
Start YaST by clicking on it under Software in your menu or by typing yast in the run command box (press Alt+F2).
Select Software Repositories.
Click on Add, select Specify URL.
Then enter a Repository Name and a URL. It's recommended to copy/paste URLs to avoid typos.
Package metadata will be downloaded and parsed - this takes time
depending on mirror speed, your bandwidth, the size of the repository,
the speed of your system.
You can remove or disable repositories at any time.
Some repositories never change, like the official oss and non-oss.
You should set refresh to Off for them. Non official and update have
new packages available all the time. It's convenient to have them
refreshed automatically at start up.
YaST-ncurses
Simply type yast in console and press Enter. Now use your TAB and cursor keys to go to the right panel. Then use TAB and your arrow keys to navigate and go to Software Repositories. To add repositories, go to Add and select specify URL. Complete the fields with the necessary information then press Finish.
Zypper
You can add repositories to YaST with the command line interface Zypper.
The syntax is:
# zypper ar -f <URL> <alias>
ar
is short form of addrepo command
-f
instruction to zypper to add autorefresh flag to newly added repo
<URL>
is URL of the repo which you type in a browser to visit repo
The following steps will show you how to upgrade your openSUSE
distribution to the following release (eg. 12.3 -> 13.1). As already
mentioned, any third party or OBS repositories can cause troubles, so it
is recommended to disable or remove them before proceeding.
Before you begin
Make sure that you read the list of annoying bugs
for the new version you are going to install. Some of them could affect
the update process. Usually, alongside the bug is listed some solution
or workaround, so make sure that you are prepared for upcoming problems.
Command line
As an example, we will be showing upgrade from 12.3 to 13.1 here:
Take a look at all repos you have
zypper lr
and remove all third party/OBS repos you no longer need
# zypper rr <alias>
Change all remaining repo URLs to the new version of the distribution (needs to be run as root)
# cp -Rv /etc/zypp/repos.d /etc/zypp/repos.d.Old
(for a backup copy), then:
# sed -i 's/12\.3/13\.1/g' /etc/zypp/repos.d/*
If you are upgrading from 12.1 or older, add non-oss-update repo
Refresh new repositories (you might be asked to accept new gpg key)
# zypper ref
If you haven't removed third party/OBS repositories you may encounter
some errors as these repositories may not exist yet or they may have
different unguessable URL. It is always recommended to remove them and
add their newer version after upgrade.
Now execute the full distribution upgrade. It is strongly recommended that you run this inside GNU screen or tmux
to protect the upgrade process in case anything should go wrong with
the X session during the upgrade. Packages for both screen and tmux are
available in the main openSUSE repositories. tmux is probably a safer
bet, because for example if upgrading from 12.1 to 12.2, you would go
from a version of GNU screen which uses FIFO pipes to a version which
uses UNIX sockets, and GNU screen has a bug which breaks compatibility between these two approaches, which means that you cannot resume a screen session created in 12.1 using the version of screen from 12.2.
# zypper dup
With the above command zypper will download all required packages and
install them in heaps. To download all packages in advance, use:
# zypper dup --download "in-advance"
If you did the above dist
upgrade before the official release date (eg. 2013-11-19 for 13.1), you
may have installed a Release Candidate (RC) or milestone version and
will need to repeat the final zypper dup step now to receive the final release.
Search for updated openSUSE 13.1 compatible third-party repositories that you used before if you still need them and add them.
WarningUse with caution. Using third-party repositories may break your system or cause instabilities.
zypper addrepo --name <name> <url> <alias>
Or, if you have URL of a .repo file:
# zypper ar <url.repo>
After upgrade, reboot is recommended to start new kernel and newer versions of everything.
In addition, zypper up
can be run from time to time to ensure you have the latest available
packages from the various repositories that you have enabled. YOU (Yast
Online Update) only addresses security updates from the official
repositories.
Setting up an OpenVPN Server with Android clients, connecting to
preconfigured wifi channels on your Android device, and more!
Download HDDownload MP4
Thanks to Micah and all others who pointed out the MS-CHAPv2
vulnetability demonstrated at DEFCON 20. I can't believe I missed this.
Check out the writeup at cloudcracker.com
Previously on the show we used Adito to setup an OpenVPN server. This time I'm using Untangle and my Open Source router software of choice.
The setup couldn't be easier so follow along as I demonstrate an OpenVPN server setup on Untangle from within a Virtual Machine
Remember, once you've setup the OpenVPN app in Untangle and created
your first user you'll want to hit Apply changes in order to find the
Distribute link. Click Distribute and then the "Other OS" link to get
the files you'll need for an Android client. Save 'em to the default
location (~/Desktop) and now you'll be ready to SCP 'em to your phone or
PC.
In Untangle just minimize the admin panel and you'll find a Terminal
link in the bottom right. You'll find the config.zip file in the Desktop
directory. In my demo the Android phone is running an SSH server on
port 4444 so the command is
ssh -p 4444 user@
cd sdcard/untangle-vpn
mv hak5* untangle-vpn/
Once everything is in the right place it's simply a matter of opening OpenVPN Connect and importing the credentials from SD card.
If this is useful to you I encourage you to check out untangle.com/hak5
- it warms my heart to be sponsored by a cool open source project that
I've been using since '09 and they might be a perfect fit for you too.
--Darren
Marissa Mayer made Yahoo's VPN famous by using it to check on the work habits
of her employees. Lost amid today's VPN conversation, however, is the
fact that virtual private networks are much more than just pipelines for
connecting remote employees to central work servers.
And that's a damn shame, because VPNs can be helpful tools for
protecting online privacy, and you need not be an office drone to enjoy
their benefits.
A VPN, as its name suggests, is just a virtual version of a secure,
physical network—a web of computers linked together to share files and
other resources. But VPNs connect to the outside world over the
Internet, and they can serve to secure general Internet traffic in
addition to corporate assets. In fact, the lion's share of modern VPNs
are encrypted, so computers, devices, and other networks that connect to
them do so via encrypted tunnels.
Why you want a VPN
You have at least four
great reasons to start using a VPN. First, you can use it to connect
securely to a remote network via the Internet. Most companies maintain
VPNs so that employees can access files, applications, printers, and
other resources on the office network without compromising security, but
you can also set up your own VPN to safely access your secure home
network while you're on the road.
Second, VPNs are particularly useful for connecting multiple networks
together securely. For this reason, most businesses big and small rely
on a VPN to share servers and other networked resources among multiple
offices or stores across the globe. Even if you don't have a chain of
offices to worry about, you can use the same trick to connect multiple
home networks or other networks for personal use. Third, if you're
concerned about your online privacy, connecting to an encrypted VPN
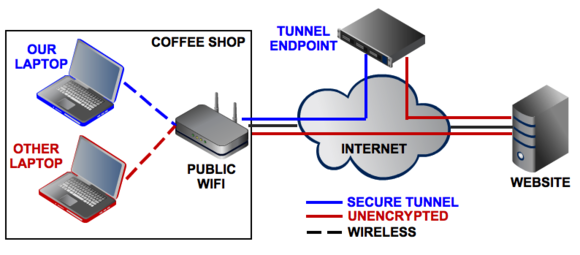
while you're on a public or untrusted network—such as a Wi-Fi hotspot in
a hotel or coffee shop—is a smart, simple security practice. Because
the VPN encrypts your Internet traffic, it helps to stymie other people
who may be trying to snoop on your browsing via Wi-Fi to capture your passwords.
Fourth and finally, one of the best reasons to use a VPN is to circumvent regional restrictions—known as geoblocking—on
certain websites. Journalists and political dissidents use VPNs to get
around state-sponsored censorship all the time, but you can also use a
VPN for recreational purposes, such as connecting to a British VPN to
watch the BBC iPlayer outside the UK. Because your Internet traffic routes through the VPN, it looks as if you're just another British visitor.
Pick your protocol
When choosing a networking protocol for your VPN, you need worry only
about the four most popular ones. Here's a quick rundown, including the
strengths and weaknesses of each.
Point-to-Point Tunneling Protocol (PPTP) is the
least secure VPN method, but it’s a great starting point for your first
VPN because almost every operating system supports it, including
Windows, Mac OS, and even mobile OSs.
Layer 2 Tunneling Protocol (L2TP) and Internet Protocol Security (IPsec) are
more secure than PPTP and are almost as widely supported, but they are
also more complicated to set up and are susceptible to the same
connection issues as PPTP is.
Secure Sockets Layer (SSL) VPN systems provide the
same level of security that you trust when you log on to banking sites
and other sensitive domains. Most SSL VPNs are referred to as
"clientless," since you don't need to be running a dedicated VPN client
to connect to one of them. They're my favorite kind of VPN because the
connection happens via a Web browser and thus is easier and more
reliable to use than PPTP, L2TP, or IPsec.
An
SSL VPN server is designed to be accessed via Web browser and creates
encrypted channels so that you can safely access the server from
anywhere.OpenVPN is exactly what it sounds like: an
open-source VPN system that's based on SSL code. It's free and secure,
and it doesn't suffer from connection issues, but using OpenVPN does
require you to install a client since Windows, Mac OS X, and mobile
devices don't natively support it.
In short: When in doubt, try to use SSL or OpenVPN. Keep in mind that
some of the services highlighted in the next section don’t use these
protocols. Instead, they use their own proprietary VPN technology.
Now, let's talk about how to create and connect to your own VPN. If
you want simple remote access to a single computer, consider using the
VPN software built into Windows. If you’d like to network multiple
computers together quickly through a VPN, consider installing
stand-alone VPN server software.
If you need a more reliable and robust arrangement (one that also
supports site-to-site connections), consider using a dedicated VPN
router. And if you just want to use a VPN to secure your Internet
traffic while you're on public Wi-Fi hotspots and other untrusted
networks—or to access regionally restricted sites—consider subscribing
to a third-party hosted VPN provider.
Set up a simple VPN with Windows
Windows comes loaded with a VPN client that supports the PPTP and
L2TP/IPsec protocols. The setup process is simple: If you're using
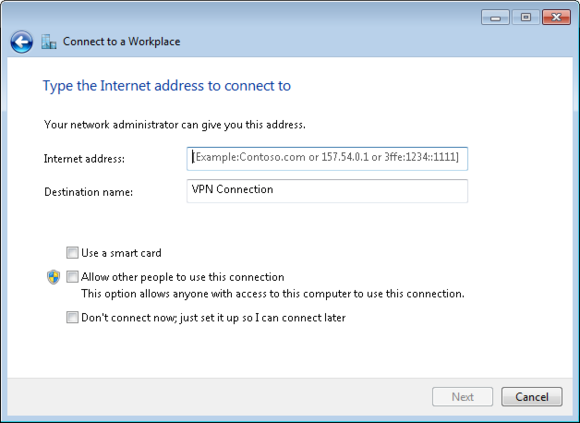
Windows 8, just bring up the Search charm, type VPN, and then launch the VPN wizard by clicking Set up a virtual private network (VPN) connection.
You can use this client to connect securely to other Windows
computers or to other VPN servers that support the PPTP and L2TP/IPsec
protocols—you just need to provide the IP address or domain name of the
VPN server to which you want to connect. If you're connecting to a
corporate or commercial VPN, you can contact the administrator to learn
the proper IP address. If you're running your own VPN server via
Windows, you can figure out the server's IP address by typing CMD in the Search charm, launching the Command Prompt, and typing ipconfig.
This simple trick comes in handy when you're setting up your Windows PC
as a VPN server, and then connecting to it so that you can securely,
remotely access your files from anywhere.
Quick note: When setting up incoming PPTP VPN connections in Windows, you must configure
your network router to forward VPN traffic to the Windows computer you
want to access remotely. You can do this by logging in to the router’s
control panel—consult the manufacturer's instructions on how to do
this—and configuring the port-forwarding or virtual-server settings to
forward port 1723 to the IP address of the computer you wish to access.
In addition, PPTP or VPN pass-through options need to be enabled in the
firewall settings, but usually they're switched on by default.
If you're using Windows 7 and you need to connect to a VPN or to
accept incoming VPN connections in that OS, check out our guide to setting up a VPN in Windows 7.
Use third-party software to create a VPN server
If you’d like to create a VPN between multiple computers to share
files and network resources without having to configure your router or
to dedicate a PC to act as the VPN server, consider using third-party
VPN software. Comodo Unite, Gbridge, and TeamViewer are all decent, reliable, and (most important) free.
LogMeIn Hamachi is a simple, elegant, and secure VPN client that's free for up to five users.
You can also use LogMeIn Hamachi for
free with five or fewer users, but it's good enough that if you have
more than five PCs you want to link up securely—say, as part of your
small-but-growing business—you should consider paying for the full
service.
Go whole hog with your own VPN router
If you want to get your hands dirty while providing robust remote
access to an entire network, or if you wish to create site-to-site
connections, try setting up a router on your network with a VPN server
and client. If you’re working on a budget, the cheapest way to set up
your own dedicated VPN router is to upload aftermarket firmware that enables VPN functionality, such as DD-WRT or Tomato, to an inexpensive consumer-level router.
The ZyXel USG20W VPN router is a smart investment if you want to set up your own dedicated VPN at home or in the office.
When you're choosing a VPN router and third-party router firmware,
make sure they support the VPN networking protocol you need for your
devices. In addition, check the VPN router to verify how many
simultaneous VPN users it supports.
Let a third-party VPN provider worry about it
If you merely want VPN access to cloak your Internet traffic while
you're using public Wi-Fi or another untrusted network, or to access
regionally restricted sites, the simplest solution is to use a hosted
VPN provider. Hotspot Shield is my favorite, as it offers both free and paid VPN services for Windows, Mac, iOS, and Android. HotSpotVPN, StrongVPN, and WiTopia are other paid services we’ve reviewed in the past.
EFFThe
Onion Router is an excellent, free utility that anonymizes your
Internet activity through a series of servers scattered around the
world.
If you want to keep your browsing activity anonymous but can't spare the cash for a paid VPN, check out the Onion Router, a network of servers that can anonymize your Internet traffic for free. Visit the TOR website
and download the latest browser bundle, and then start browsing with
the TOR extensions enabled. The software will encrypt your connection to
the TOR server before routing your Internet traffic through a
randomized series of servers across the globe, slowing your browsing
speed but cloaking your online activity from prying eyes.
No matter how you choose to go about it, start using a VPN today. It
takes a bit of work up front, but spending the time to get on a VPN is
one of the smartest, simplest steps you can take toward making your
online activities more secure.